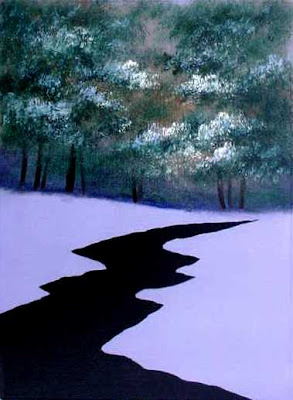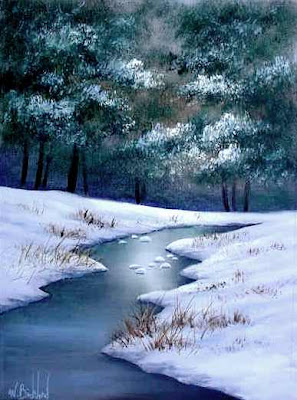


This was created this afternoon and I took step-by-step photos along the way to highlight certain points. Although this is considered an Oil painting, I did start with some Acrylic gessoes for the underpainting; a blue-gray for the snow and black for the stream. The idea is to let the underpainting show through to influence the top layer of Oil colors.
Photo #1 - The blue and black Acrylics were applied using a disposable foam brush ( hardware-store variety ) When that was completely dry, I scrubbed a thin coat of LIQUIN over the entire canvas to ease the application of the Oils and to facilitate blending. ( any clear Oil medium would suffice )
Photo #2 - Using a Fan brush, I used small amounts of Van Dyke Brown, Burnt Sienna, Sap Green and Ultramarine Blue to scrub in a "mottled" suggestion of deep woods. I purposely kept the bottom area darker to help convey the feeling of deeper shadows in the undergrowth. Notice that I did not cover up all of the Acrylic undertone and it is peeking through here and there. ( the Oils were applied very thinly and scrubbed in )
Photo #3 - Tree trunks were added using Van Dyke Brown on a 3/8" Flat brush. Evergreen branches were rendered with a Fan brush and varying mixtures of Sap Green, Ultramarine Blues and Van Dyke Brown. Snow on the branches was indicated with Blue and White on the Fan brush, ultimately building to pure Titanium White for the lightest highlights which were placed more centrally on the canvas.
Photo #4 - Using my background Blues, Greens and Browns, I painted the reflection colors into the water. This was with the Flat brush. Note that the brightest glow in the water is nearer the center as it will be an important part of the focal point, or "center of interest". I used T. White for this area. I also started defining the snow shadows and lay of the land at this phase, again saving the pure whites for the middle area of the canvas.
Photo #5 - More snow highlights and some grasses poking through were added. I used the Browns on the Fan brush for the grass stubble, then added more definition ( especially nearer the foreground ) using a Script Liner. As an adjustment, I brightened the glint of light in the water using more Titanium White, which I felt gave it some extra oomph. Lastly, I used some of my Blues and White on the Script Liner to create the snow-covered rocks in the stream.
There you have it! Although there are many different ways to execute a painting, this is an approach I use quite often. By using the Acrylic underneath, I find that I can use less paint over-all in the Oil stage, which keeps me from getting bogged down on a slippery, thick canvas.
I choose my underpainting colors according to my subject. For example, I might use a Yellow or a Red for a sunset scene. Give it a try!


18 comments:
Thanks for sharing Wilson!! When I get some oils I'll try it! Merry Christmas!
Dawn
Merry Christmas to you too, Dawn!
Muy bonito Sr. Wilson. Feliz Navidad
I like how you brought the painting to life through the step by step photos of it and your great way of explaining things. Snow in general gives me problems, and yours looks so real. I wanted to let you know that I loved the DVD of the barn painting and I tried a lot of the techniques on a painting I was working on and what I learned from you made the painting so much better. Thank you so much Wilson!
That technique I used for my barn Dvd is a great one to know. I'm glad you found it useful.
Happy New Year Wilson!!!
The same to you, Miss Savoia!
Haha! I haven't been a Miss for 10.5 years ;) Been a Mrs since 1999 via Vegas!
Well, I guess I was in the dark regarding that one!!! lol
Wilson, Thanks for sharing, my friend! This looks like a fun project. I'm starting to use more acrylic underpainting in my work and am really enjoying the effect. Some day I'll get brave enough to do a whole painting in acrylic. LOL
As you already know, with Acrylics it's just a matter of working quickly before to paint starts to set. Yes, it sounds easy, but it takes some practice to get comfortable and fluid with it.
But, I KNOW you can do it!
LOL nothin like learning something new on a daily basis!
See? You CAN teach an old dog new tricks! lol
Hahaha!!! I guess your right!!
Hey Wilson,
I emailed a couple of greeting card companies (takes 30 days for a reply) Two were Canadian, the other two were UK...do you think I should bother with an international company? Not sure how week that would work.
Dawn
Sure, I don't see why not! If they make an offer, they make an offer, whether it's the UK, or not. Just make sure they don't pay you in shillings! lol
The more places you submit to, the better the chance of getting accepted. What have you got to lose?
Haha!! Your right! I have to go through some greeting cards of my own for some smaller companies listed on the backs. Might have some luck with them.
Dawn
Just FANTASTIC!!! wHAT AN EASY WAY TO DO THIS AS YOU EXPLAINED IT. I am sure I am going to give it a try when I get time! Thanks for posting the painting and some guide lines to do it also.
B.Narayanan.
Post a Comment